My sweet little two year old boy and I got a little closer last night. See now we are on a first name basis... He's takin to calling me Courtney.
I'll set the scene for you... You're a little preoccupied by something and your selective hearing has kicked in. Your precious little boy calls for you "Mom". Since you don't hear any urgency in his voice, it becomes white noise to you so you can just finish what you are doing (admit it, we have all done this).
And then...
instead him calling out "Mom" it's COURTNEY!!
Ay-yi-yi
I hope this doesn't become a trend.
Monday, March 26, 2012
Sunday, March 25, 2012
Poppy Seed Chicken
Since the weather is starting to warm up, I figured I'd better get my need for "cold weathered" comfort foods outta my system now. This casserole is so easy and quick to put together. You could also, double the recipe, make up two and bake one now and throw one in the freezer for another time.

Poppy Seed Chicken Casserole
What you will need:
4 boneless, skinless chicken breasts, cooked and cubed
1 cup (8oz) sour cream (I usually use low fat)
2 cans of cream of chicken soup (I usually use the 98% fat free one by Campbell's)
1 stick of butter, melted
55 Ritz crackers, crushed (put in a Big Ziploc bag and roll out with your rolling pin)
1 TBSP poppy seeds
What you will do:
Preheat oven to 350°.
Combine butter, crackers, and poppy seeds. Put half of the mixture in the bottom of a greased casserole dish (the one I use is 2½ qts).
Combine chicken, sour cream and soup. Spread on top of cracker mixture.
Sprinkle remaining cracker mixture on top. Cook at 350° for an hour.
Source: Unknown
Monday, March 19, 2012
Pony-Os

Are you a sucker for cute hair ties? Pony-Os are easy to make at home. All you need is some ribbon and a few other tools you probably already have around the house. Below I will show you how I make mine.
Gather your supplies.
You will need:
An assortment of ribbon (I used about 7 different kinds for mine)
tape measure
hot glue gun
wire cutters
lighter and/or clear nail polish
scissors
elastic hair ties
zip strips


First begin by cutting your ribbon. I cut mine to 12".
(Remember they will be folded in half so they will only hang half the length that you cut in your hair)
(Remember they will be folded in half so they will only hang half the length that you cut in your hair)

Next trim the ends.
(You don't have do to this, but I think it looks nicer)

Heat treat the ends.
(You can use clear nail polish for ribbon that can't be heat treated)

Lay your widest ribbon straight across and apply a small dot of hot glue to the center. Start gluing your ribbon in a cross pattern


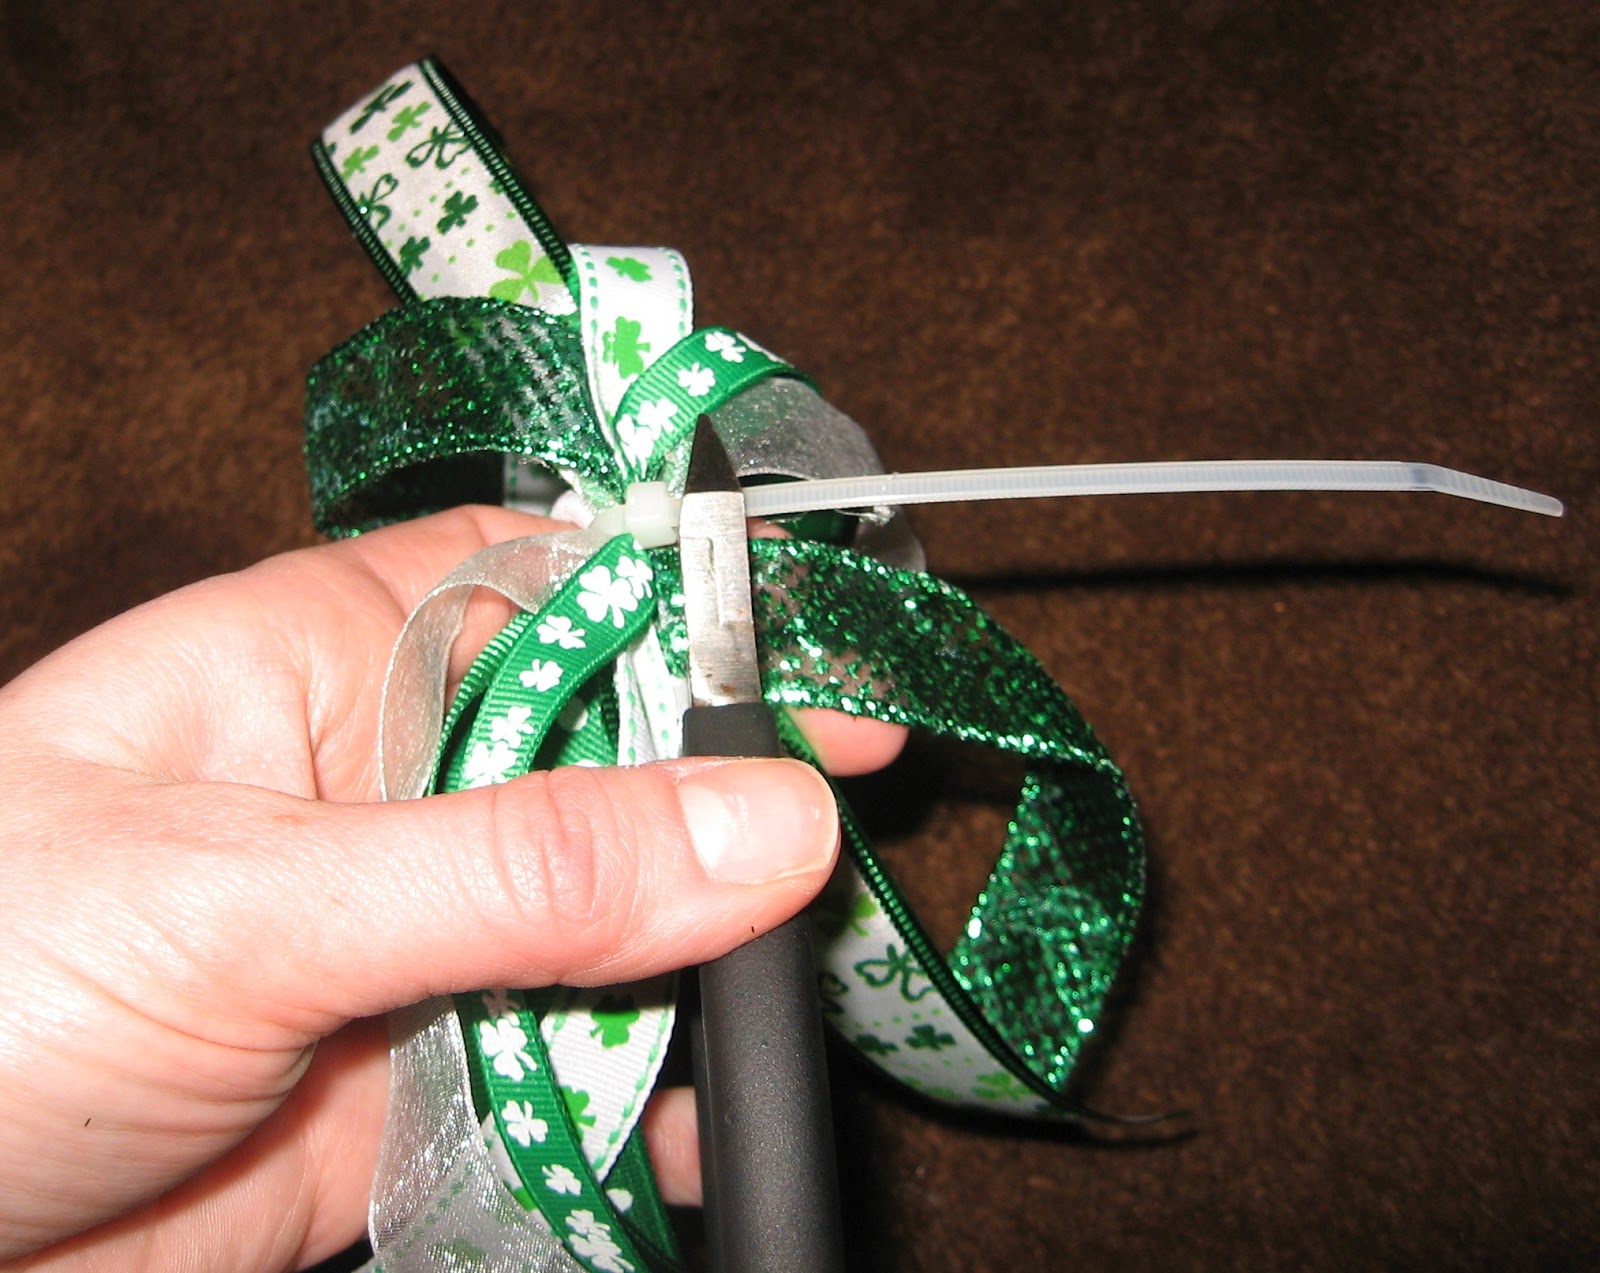
Gather your ribbons in center and wrap a zip strip around the ribbon and elastic hair tie


Pull the zip strip as tight as you can

Using wire cutters, trim off the tail of the zip strip

Choose one of your wider ribbons and cut to 5½ inches

Tie a knot in the center

Hot glue the "knot" onto the square part of the zip strip.
Hot glue the ends of the ribbon around the rest of the zip strip to hide it.
Trim off any excess ribbon.
(Sorry I don't have better pictures of this step, it was hard to get a good shot of it)


Your finished Pony-O!

Sunday, March 11, 2012
Milestones you don't always read about in the book
It's funny how when you're least expecting it your kids just 'get older'. And by get older I mean they do something so insanely small that in fact it's a huge turning point in their life that instantly makes them "older". I know it seems like I'm making no sense so let me explain.
Over the weekend, my daughter and I, along with a couple of her friends, attended a Girl Scouts' 100 year anniversary celebration. They had different activities set up through out the building, some of which were crafts.
One of the first crafts we stopped at, you could make a key chain out of plastic cord (I remember calling this gimp when I was younger, does anyone else?). The volunteer handed the girls their supplies and showed them how to weave the cords back and forth. With the help of the volunteer my daughter was able to do this, but as she sent us on our way to finish the key chain I figured it would no longer be her craft, it would become mine. It's one of those things where they SAY ages 5 and up should be able to do it, but it seems more like ages 25 and up.
We sat off to the side for awhile working on her key chain together. Soon the girls decided they had enough of the key chain making and they would finish them at home. They put them in their bags and I figured that's the last I'd see of the key chain.
We then set off to see what other activities were waiting for us. Well, this was a big place, with a lot of activities, a lot of people, a lot of lines, and a lot of waiting. While the girls were waiting, out came the key chains...and they attempted to work on them...and guess what?! They did it! They were able to weave the little cords and work on their crafts all by themselves! Really this seems like no big deal, but to a parent who always gets stuck finishing the craft because their child is simply to young to do it, this is MAJOR! My little girl created her first key chain! Now she should be able to start working on other things such as friendship bracelets and the like...and you didn't make friendship bracelets when you were one of the "little girls". The "older" girls made those...(ya know the 7 and 8 year olds). So like I said something so incredibly pointless and small is a huge milestone in a mom's book.
Now on to my son...
A few months ago my son was still in his crib. He just turned 2 in December so really there's nothing wrong with that. In fact if it weren't for the fact that I was scared he was going to flip himself out of his crib he'd probably still be in one. He didn't try to climb out of his crib like most kids do. You know one leg over the rail, followed by the other. He would try to flip out head first so into a toddler bed he went.
The first week or so was fine. He slept great and in the morning he'd call for us to come get him. I didn't have the heart to tell him all he had to do was stand up... and really I didn't need to, he figured that out himself soon enough.
Now for the past couple of months he just gets up. Probably because, well he can. He wakes up and comes in our room a few times a night. Yes, a few times and yes, every night. And then he's up at 5:30 a.m. ready for the day. I was thinking maybe a real bed would be more comfortable for him and keep him sleeping longer.
I came home from the Girl Scout celebration and the hubs tells me to go check on him. I walk in and he's sleeping soundly in a TWIN BED! My little boy immediately didn't seem so little anymore. All grownsed up in his big boy bed. Another simply stupid thing that is a major milestone for mom.
Of course now I need to go out and buy him some new big boy bed truck bedding, and some embroidery floss for my daughter to get started on her friendship bracelets.
Saturday, March 10, 2012
Not your average Lasagna
I LOVE me some Italian food and lasagna is one of my favorite dishes. I inherited this recipe from an old family friend. It really isn't your typical lasagna since there's no ricotta (or cottage cheese) involved and it includes....dare I say it....Velveeta. I feel since it includes Velveeta it can no longer be label as an Italian dish but nonetheless it's deelish! Try it... You'll like it.

What you will need:
1lb. ground beef
½ C. chopped onion
1 lb can tomatoes (this is what my recipe says, I use the big can of crushed tomatoes)
1/3 C. water
1 garlic clove, minced
1 tsp oregano
¼ tsp pepper
1 6oz can tomato paste
½ C grated Parmesan
9 lasagna noodles (cooked)
2 (6oz) packages sliced mozzarella
½ lb velveeta cheese, thinly sliced
What you will do:
Brown meat with onion in large saucepan, drain. Stir in tomatoes, water, garlic,tomato paste, and seasonings. Cover and simmer 30 minutes.
Preheat oven to 350°.
In 13 x 9 baking dish, put a small layer of meat sauce down. Then layer the noodles, meat sauce, and cheeses. Repeat 2 more times. Bake at 350° for 30 minutes.
This may also be made up and then frozen. Just freeze before baking and when you want to bake it, let it sit out for a half hour and then bake at 350° for 1 hour.
Subscribe to:
Comments (Atom)